ถึงผู้อ่านทุกท่าน เนื่องจากตอนนี้เจ้าของบล็อกงานยุ่งมาก ไม่ค่อยมีเวลามาอัพเดทเมนูอาหารบ่อยๆ แต่อย่างไรก็ดี เจ้าของบล็อกจะพยายามมาอัพเมนูอาหารอยู่เรื่อยๆ เพื่อผู้อ่านและผู้ที่ติดตามทุกคน ขอบคุณที่คอยติดตามนะคะหากมีข้อแนะนำ ก็บอกกล่าวกันได้นะค่ะ หรือหากมีข้อคิดเห็นใดๆ ก็มาแลกเปลี่ยนความคิดเห็นกันค่ะ
Dear fans, now I’m very busy so I don’t have time to update the blog with new recipes and as often as I would like to do it. However, I will try hard to keep updating with more recipes. Thank you for all support and if you have any ideas, questions or suggestions, please let me know.
Queridos fans, estes últimos dias tenho andado muito ocupada e não tenho tido tempo para publicar novas receitas com a regularidade que gostaria. No entanto, irei tentar continuar a publicar receitas. Obrigado pelo vosso apoio e se tiverem idéias, questões ou sugestões, escrevam-me.
After trying my recipes, please leave a comment about your experience... Thank you...
Depois de experimentarem as minhas receitas, deixem um comentário acerca da vossa experiência... Obrigado...

Showing posts with label ขนมหวานและขนมอบ - Desserts - Sobremesas. Show all posts

Tuesday, July 6, 2010

ข้าวเหนียวเปียกลำไย - Sweet black sticky rice with longan in coconut milk


ข้าวเหนียวเปียกลำไย

ส่วนผสม


- ข้าวเหนียวดำ 1 ถ้วย
- ข้าวเหนียวขาว ¼ ถ้วย
- น้ำตาลทราย ½ ถ้วย
- เกลือป่น 1 ช้อนชา
- กะทิ 1 ถ้วย
- น้ำเปล่า 4 ถ้วย
- ลำไยปอกเปลือก แกะเม็ดแล้ว ตามชอบ
- เผือก ตามชอบ
- หมายเหตุ: ถ้ามีใบเตยสด น้ำใบเตย 1 ใบ มาต้มกับน้ำเปล่า 1 ถ้วย และส่วนผสมของน้ำเปล่า 3 ถ้วย ก็จะได้ส่วนผสมที่เป็นน้ำทั้งหมด 4 ถ้วย แต่ถ้าหาใบเตยไม่ได้ก็ใช้เป็นส่วนผสมน้ำเปล่าทั้งหมด 4 ถ้วยก็ได้
 วิธีทำ


1. แช่ข้าวเหนียวดำและขาว ข้ามคืนเอาไว้ เวลาทำจะได้ไม่เสียเวลาต้มนานเพราะข้าวเหนียวบานแล้ว
2. ตั้งน้ำ ต้มน้ำเปล่า 3 ถ้วย ไฟปานกลาง พอน้ำเดือด นำข้าวเหนียวดำลงไปต้ม
3. จากนั้นอีกประมาณ 10 นาที พอข้าวเหนียวดำเริ่มนิ่มแล้ว เติมข้าวเหนียวขาวลงไปและเติมน้ำเปล่าที่เหลืออีก 1 ถ้วย ถ้าใช้น้ำใบเตยให้ใส่ลงไปในขั้นตอนนี้ ที่เติมข้าวเหนียวขาวลงไปผสมกับข้าวเหนียวดำก็เพราะว่าข้าวเหนียวขาวอมน้ำมากกว่าข้าวเหนียวดำ ดังนั้นข้าวเหนียวเปียกลำไยจึงมีลักษณะข้น
4. ต้มต่อไปอีกและคอยคนตลอดเวลาเพื่อไม่ให้ข้าวเหนียวติดก้นหม้อ
5. พอข้าวเหนียวขาวเริ่มนิ่มแล้ว เติมน้ำตาลลงไป คนจนกระทั่งน้ำตาลละลายหมด จากนั้นใส่ลำไยและเผือกลงไป เคี่ยวต่อไปจนส่วนผสมเข้ากันดี ปิดไฟ ยกลง
6. เตรียมหม้ออีกใบหนึ่ง นำกะทิไปเคี่ยวจนเดือดและเริ่มข้นขึ้น เติมเกลือลงไปเล็กน้อย ชิมรสที่ชอบ ใครชอบเค็มหน่อยก็เติมเกลือมากหน่อย คนให้เข้ากัน ปิดไฟ ยกลง
7. เวลาเสิร์ฟก็ตักส่วนผสมของข้าวเหนียวเปียก ราดด้วยกะทิ เสิร์ฟได้ทั้งร้อนและเย็น


Sweet black sticky rice with longan in coconut milk


Ingredients


- 1 cup of black sticky rice
- 1/4 cup of white sticky rice
- 1/2 cup of white sugar
- 1 teaspoon of salt
- 1 cup of coconut milk
- 4 cups of water
- Some pitted longan (depends on you)
- Some taro (optional)
- If you can find fresh pandanus leaf, use 1 leaf to boil with 1 cup of water then add in the water mixture (3 cups of water) but if you can’t find it, just use 4 cups of water with no pandanus


How to make it


1. Soak separated black and white sticky rice over night
2. Boil 3 cups of water in the pan in medium heat then add the black sticky rice to boil
3. After 10 minutes, when the black sticky rice gets soft, add the white sticky rice and put more 1 cup of water. (The season of putting the white sticky rice is to make all together because the white one absorb more water than the black)
4. Keep boiling and stir all the time for the sticky rice not to stick to the pan
5. When the white sticky rice is soft, add white sugar. Stir until the sugar melt then place the longan and the taro. Simmer a bit more to make all ingredient mix together. Remove from the heat
6. In another saucepan, add coconut milk and simmer until it’s hot. Then add salt and stir it well. Remove from heat
7. To serve put the sweet sticky rice with longan in the bowl then add the coconut milk on top. Can serve both hot or cold


Arroz doce glutinoso com olhos-de-dragão e leite de coco


Ingredientes


1 copo de arroz glutinoso preto
1/4 copo de arroz glutinoso branco
1/2 copo de açúcar branco
1 colher de chá de sal
1 copo de leite coco
4 copo de água
- Olhos de dragão sem caroço (a gosto)
- Inhame (opcional)
- Se conseguir encontrar folha de pandâno fresca, ferva-a num copo de água e depois junte a restante água (3 copos de água) mas se não encontrar pode usar quatro copos de água sem o pandâno


Como preparar


1. Meta o arroz, em separado, de molho durante a noite
2. Com três copos de água, leve o arroz glutinoso preto a cozer em lume brando
3. Passados 10 minutos de fervedura e o arroz esteja a ficar mole, junte o arroz glutinoso branco e mais um copo de água. (Mete-se o arroz branco para misturar com o preto só depois deste estar quase cozido porque o branco absorve muito mais água)
4. Deixe ferver mexendo sempre para que não queime
5. Quando o arroz branco estiver cozido, junte o açúcar branco. Misture tudo muito bem até o açúcar se dissolver e depois junte os olhos de dragão e o inhame e deixe ferver mais um pouco para ligar tudo. Retire do lume
6. Noutra panela leve o leite de coco a ferver e adicione o sal. Retire do lume
7. Para servir meta o arroz glutinoso doce com olhos de dragão numa tigela e regue com leite de coco. Pode ser servido quente ou frio


Friday, May 14, 2010

ช็อคโกแลตเค้ก - Chocolate cake - Bolo de chocolate -

ช็อคโกแลตเค้ก

ส่วนผสมเค้ก (ทำเค้กสูตรนี้สองครั้งให้เป็นสองชิ้นจะได้ไม่ต้องตัดเค้ก)
- แป้งสาลี 1 ถ้วย
- ผงฟู 1/2 ช้อนชา
- ช็อคโกแลตชนิดไม่หวาน 70 กรัม
- เนยจืด ½ ถ้วย
- กาแฟเอสเปรสโซ หรือกาแฟแบบเข้มข้น 150 มิลลิลิตร
- เกลือ เล็กน้อย
- น้ำตาลทราย 1 ถ้วย
- วิสกี้ (เหล้าอะไรก็ได้ แต่เราใช้ black lable) 30 มิลลิลิตร
- ไข่ไก่ 1 ฟอง
- น้ำวนิลลา 1 ช้อนชา
- ผงโกโก้สำหรับโรยที่ถาดอบขนม

ส่วนผสมครีม
- วิปปิ้งครีม 1 ถ้วย
- น้ำวนิลลา ½ ช้อนชา
- น้ำตาลไอซิ่ง 1 ช้อนชา

ส่วนผสมไส้ช็อคโกแลต
- นมข้นจืด ½ ถ้วย
- น้ำตาลทรายแดง ¼ ถ้วย
- เนยจืด 4 ช้อนโต๊ะ
- ช็อคโกแลตชนิดหวาน 45 กรัม
- ไข่ไก่ เฉพาะไข่แดง 2 ฟอง
- น้ำวนิลลา ½ ช้อนชา
- อัลมอนด์บด ½ ถ้วย
- ถั่วเฮเซลนัท ½ ถ้วย
- มาชเมลโลชิ้นเล็ก 1 ถ้วย


วิธีทำเค้ก
1. เตรียมเตาที่อุณหภูมิ 180°C ทาเนยที่พิมพ์ขนมเค้ก 9 นิ้ว ให้รอบ จากนั้นร่อนผงโกโก้ให้ทั่วรวมทั้งด้านข้างด้วย
2. ร่อนแป้งกับผงฟูด้วยกัน 2 พักไว้
3. เตรียมหม้อตุ๋นไว้ ใช้ไฟต่ำ ใส่ช็อคโกแลต เนย กาแฟ เกลือ และน้ำตาลละลายให้เข้ากัน คนเรื่อยๆ จนกว่าส่วนผสมละลายหมดและมีลักษณะข้น เติมวิสกี้หรือเหล้าลงไป คนให้เข้ากัน เทส่วนผสมนี้ลงไปในชาม พักไว้ให้เย็นลง
4. ตีไข่กับน้ำวนิลลาด้วยความเร็วปานกลาง จากนั้นค่อยๆ เติมแป้งทีละนิดแล้วเปลี่ยนเป็นความเร็วต่ำ จากนั้นใส่ส่วนผสมช็อคโกแลตที่ละลายไว้ลงไปทั้งหมด คนให้เข้ากัน
5. เทส่วนผสมลงในพิมพ์ขนมเค้ก อบประมาณ 25-30 นาที ด้วยอุณหภูมิ 180°C ระวังอย่าอบขนมเค้กนานไป ไม่งั้นเนื้อขนมเค้กจะแห้งเกินไป
6. เมื่ออบเสร็จแล้ว พักไว้บนตะแกรงประมาณ 10 นาที จึงค่อยเอาขนมเค้กออกจากพิมพ์ แล้วพักไว้บนตะแกรงอีกครั้ง


วิธีทำไส้ช็อคโกแลต
1. ผสมนมข้นจืด น้ำตาลทรายแดง เนย ช็อคโกแลต ไข่แดง และ น้ำวนิลลาเข้าด้วยกัน นำไป
2. ตั้งไฟปานกลาง คอยคนเรื่อยๆ ประมาณ 10 นาที จนกว่าช็อคโกแลตและน้ำตาลละลายหมด และส่วนผสมข้นขึ้น ยกขึ้นจากเตา
3. ใส่ถั่วต่างๆ และมาชเมลโลลงไป คนให้เข้ากันจนมาชเมลโลละลาย
4. พักให้เย็นแล้วนำเข้าตู้เย็นให้ส่วนผสมเกาะตัวกันดีสำหรับนำมาทาเป็นไส้


วิธีทำครีม
1. นำวิปครีมมาตีกับน้ำตาลไอซิ่ง ด้วยความเร็วสูง พอครีมเริ่มฟูให้เติมน้ำวนิลลาลงไป
2. ตีจนครีมขึ้นฟู ก็สามารถนำมาใช้ได้เลย


วิธีประกอบเค้ก
1. ถ้าทำส่วนผสมของเค้กด้านบนต้องอบขนมเค้ก 2 ครั้ง เพื่อให้ได้เค้ก 2 ชิ้น แต่ถ้าอยากอบทีเดียวก็ให้เพิ่มส่วนผสมอีกเท่านึง พอเค้กเย็นตัวลงก็ตัดครึ่ง แล้วนำไส้ช็อคโกแลตที่เตรียมไว้ ทาให้ทั่วระหว่าง 2 ชั้น ทาให้หนาๆ เพราะไส้ช็อคโกแลตจะซึมเข้าเนื้อเค้กด้วย
2. จากนั้นก็ทาวิปครีมที่ตีแล้ว แต่งด้านหน้าและด้านข้างตามชอบใจ


Chocolate cake

Ingredients for cake (repeat the dosage because the cake has to be done twice)
- 1 cup of plain flour
- ½ teaspoon of baking powder
- 70 grams of unsweetened chocolate
- ½ cup of unsalted butter
- 150 ml of espresso or strong coffee
- Pinch of salt
- 1 cup of white sugar
- 30 ml of whisky (I used Johnnie Walker Black Label)
- 1 chicken egg
- 1 teaspoon of vanilla essence
- Unsweetened cocoa for dusting

Ingredients for cream
- 1 cup of whipping cream or double cream
- ½ teaspoon of vanilla essence
- 1 teaspoon of icing sugar

Ingredients for chocolate filling
- ½ cup of evaporated milk
- ¼ cup of light brown sugar
- 4 tablespoons of unsalted butter
- 45 grams of plain chocolate
- 2 egg yolks
- ½ teaspoon of vanilla essence
- ½ cup of chopped almond
- ½ cup of chopped hazelnut
- 1 cup of small marshmallows


How to do the cake (This has to be done twice because we need two pieces of cake)

1. Preheat the oven to 180°C. Spread the butter in a 9” container. Dust the bottom and the sides with cocoa
2. Sift the flour and baking powder 2 times. Rest it
3. In a sauce pan over low heat, melt the chocolate, butter, espresso, salt and sugar. Stir it until the sugar dissolves and the ingredients get smooth and then add the whisky. Mix them well. Move to another bowl and let it cool slightly
4. In an electric mixer, at medium speed, beat the eggs with the vanilla essence. Then decrease the speed and add the flour little by little. After that add the chocolate mixture into the bowl and mix everything well
5. Pour the mix into the prepared container. Bake it for 25-30 minutes at 180°C. Don’t over bake or the cake will become too dry
6. Cool it for 10 minutes and then remove from the container and place on a wire rack to cool completely

How to do the chocolate filling
1. Mix evaporated milk, light brown sugar, butter, chocolate, egg yolks and vanilla essence in the saucepan
2. Simmer over medium heat, stir frequently for 10 minutes until the chocolate and sugar are melted and smooth. Remove from the heat
3. Add all the nuts and marshmallows. Stir until melted
4. refrigerate until thick enough to spread


To make the cream
1. In the bowl, whip the cream and the icing sugar with high speed until firm peaks form. Then add the vanilla essence
2. When the cream is firm, stop whipping. Ready to use

How to assemble the cake
1. If you don’t want to bake the cake twice, just double the quantity and bake it just one time. After bake let it cool down, cut it in half to get 2 pieces. Then spread the chocolate filling and put it together again. Put a lot of filling because most of it will be absorbed by the cake
2. Then spread the cream to cover all the cake and decorate


Bolo de chocolate

Ingredientes para o bolo (repita a dose porque o bolo tem que ser feito duas vezes)
- 1 copo de farinha
- ½ colher de chá de fermento em pó
- 70 gramas de chocolate amargo
- ½ copo de manteiga sem sal
- 150 ml de café expresso ou café forte
- Pitada de sal
- 1 copo de açúcar branco
- 30 ml de whisky (eu usei Johnnie Walker Black Label)
- 1 ovo
- 1 colher de chá de essência de baunilha
- Cacau em pó amargo para polvilhar


Ingredientes para o creme
- 1 copo de chantilly ou natas
- ½ colher de chá de essência de baunilha
- 1 colher de chá de açúcar de padeiro


Ingredientes para o recheio de chocolate
- ½ copo de leite evaporado
- ¼ copo de açúcar torrado light
- 4 colheres de sopa de manteiga sem sal
- 45 gramas de chocolate
- 2 gemas de ovo
- ½ colheres de chá de essência de baunilha
- ½ copo de amêndoa picada
- ½ copo de noz picada
- 1 copo de marshmallows pequenos


Como preparar o bolo (Isto tem que ser feito duas vezes porque precisamos de dois bolos)

1. Aqueça o forno a 180°C. Barre uma forma de 9” com manteiga. Polvilhe-a com o cacau
2. Peneire a farinha e o fermento duas vezes. Meta de lado
3. Numa caçarola em lume baixo, derreta o chocolate com a manteiga, café, sal e açúcar Mexa até dissolver bem o açúcar e a mistura fique cremosa, para depois adicionar o whisky. Misture tudo muito bem. Mude a mistura para uma taça e deixe arrefecer ligeiramente
4. Numa batedeira eléctrica, a uma velocidade média, bata os ovos com a essência de baunilha. Diminua a velocidade e acrescente a farinha pouco a pouco. Depois junte a mistura do chocolate e mexa muito bem
5. Meta esta mistura na forma untada e leve ao forno durante 25-30 minutos a 180°C. Não coza demasiado porque pode ficar muito seco
6. Arrefeça a forma durante 10 minutos e depois retire o bolo e meta-o numa rede metálica para arrefecer completamente

Como preparar o recheio de chocolate
1. Misture o leite evaporado, o açúcar torrado light, a manteiga, o chocolate, as gemas de ovo e a essência de baunilha numa panela
2. Deixe em lume médio, mexendo sempre durante 10 minutos, até que o chocolate e o açúcar tenham dissolvido completamente e a mistura tenha ficado cremosa. Retire do lume
3. Junte as amêndoas, as nozes e os marshmallows. Mexa até que estes dissolvam
4. Meta no frigorífico até que fique espesso o suficiente para barrar

Para preparar o creme
1. Misture as natas e o açúcar de pasteleiro a alta velocidade até que fique firme. Depois adicione a essência de baunilha
3. Quando estiver bem firme deixe de bater. Está pronto a usar

Como montar o bolo
1. Se não quiser ter o trabalho de fazer duas vezes o bolo, pode optar por duplicar as quantidades e cozê-lo uma só vez. Depois deixe arrefecer e corte-o ao meio, ficando com duas metades. Após isto, basta espalhar o recheio de chocolate e voltar a juntar. Meta muito recheio porque a grande parte será absorvido pelo bolo
2. Depois de ter as duas partes juntas, cobra com o creme e decore a gosto

Thursday, May 13, 2010

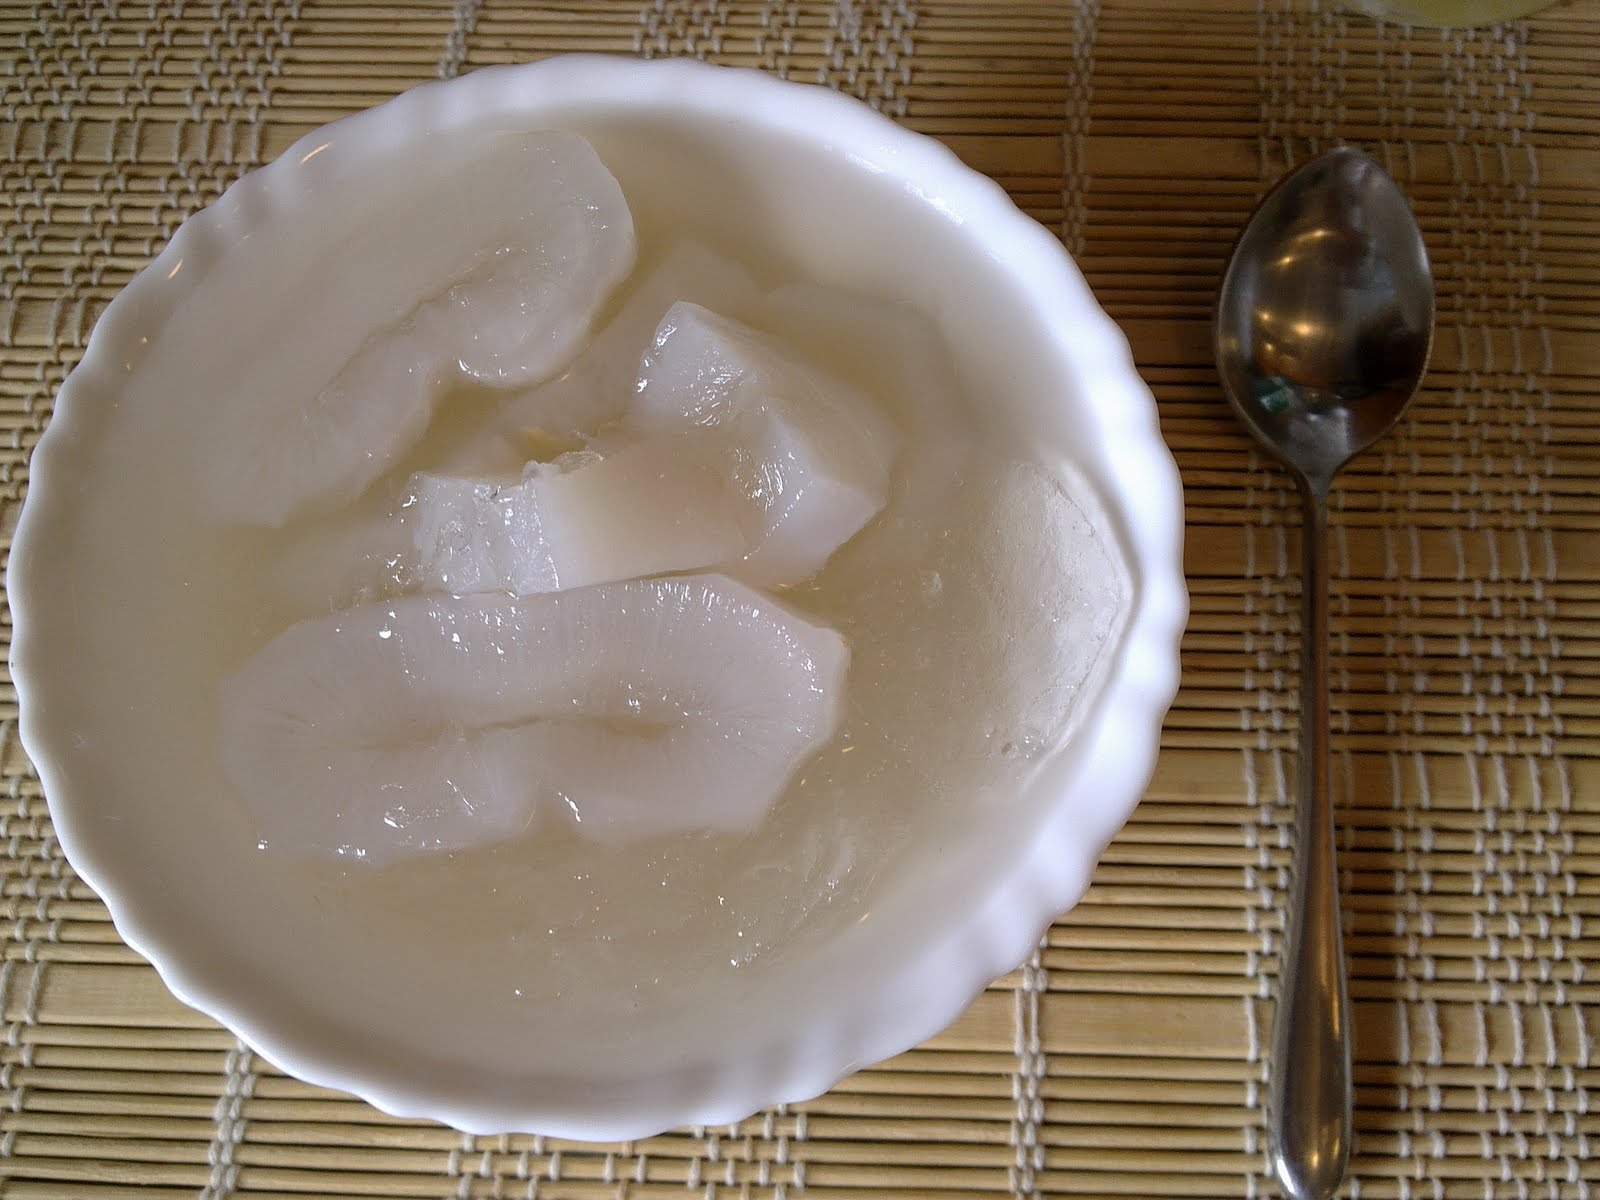
ลูกตาลลอยแก้ว - Palm fruit with syrup - Fruto de palmeira com calda


ลูกตาลลอยแก้ว

ส่วนผสม
- ลูกตาล 250 กรัม
- น้ำตาลทราย 100 กรัม
- น้ำเปล่า 2 ถ้วย
- ใบเตย 1- 2 ใบ
- น้ำแข็งบด


วิธีทำ
1. นำลูกตาลมาปอกเปลือก ปอกเปลือกส่วนที่เป็นแข็งๆ สีเหลืองขาวออก ล้างให้สะอาด แล้วหั่นเป็นชิ้นบางๆ ตามขวาง หั่นแล้วจะมีช่องตรงกลาง
2. เติมน้ำใส่หม้อ ใส่น้ำตาลทราย และใบเตย เคี่ยวใช้ไฟปานกลาง
3. เมื่อน้ำตาลทรายละลายหมดแล้ว ยกลงและกรองด้วยผ้าขาวบาง หรือกรองเอาขี้ผงและใบเตยออก
4. นำลูกตาลผสมลงไปกับน้ำเชื่อม ตั้งไฟประมาณ 5 นาที พอเดือดแล้ว ยกลง พักให้เย็น
5. พร้อมเสิร์ฟ เวลาทานควรนำไปแช่ให้เย็นก่อน ใส่ถ้วยโรยด้วยน้ำแข็งบด


Palm fruit with syrup


Ingredients
- 250 grams of palm fruit
- 100 grams of white sugar
- 2 cups of water
- 1-2 pandan leafs
- Ice


How to make it
1. Peel the palm fruit (the hard area with the white – yellow color). Wash it well and cut it in the width. If you cut in other way will have a whole in the middle
2. Put the water in a pan add the white sugar and pandan leaf and let it simmer in medium heat
3. When all the sugar dissolves, remove from heat. Filter it with a thin cloth or just remove the residues and the pandan leaf.
4. Add the palm fruit to the syrup and heat it again for 5 minutes. When it start boiling, remove and let it cool for a while
5. For a better taste should serve it cold. Put the dessert in the small bowl and add ice on top


Fruto de palmeira com calda


Ingredientes
- 250 gramas de fruta de palmeira
- 100 gramas de açúcar branco
- 2 copos de água
- 1-2 folhas de pandano
- Gelo


Como preparar
1. Descasque a fruta de palmeira (a parte mais dura de cor branca-amarelada). Lave-a e corte ao comprido. Se cortar doutra forma fica com um buraco no meio
2. Meta a água numa panela e junte o açúcar e as folhas de pandano e deixe ferver em lume médio
3. Quando todo o açúcar tiver dissolvido, retire do lume. Filtre o xarope com um pano e retire todos os resíduos e as folhas de pandano
4. Junte a fruta de palmeira ao xarope e meta no lume durante 5 minutos. Quando começar a ferver, retire e deixe arrefecer
5. Para ser mais saboroso, dever servir-se bem frio. Meta a sobremesa numa taça e cobra com gelo

Tuesday, May 4, 2010

คุ้กกี้ชอคโกแลตชิพ - Double chocolate chips cookies- Biscoitos de duplo chocolate com pepitas


คุ้กกี้ชอคโกแลตชิพ

ส่วนผสม
‐ แป้งสาลีอเนกประสงค์ 2 ถ้วย
‐ เนยเค็ม 250 กรัม
‐ น้ำตาล 2 ถ้วย
‐ ไข่ไก่ 2 ฟอง
‐ น้ำวนิลลา 2 ช้อนชา
‐ ผงโกโก้ 1 ถ้วย
‐ เบกกิ้งโซดา 1 ช้อนชา
‐ เกลือ ½ ช้อนชา
‐ ชอคโกแลตชิพ 1 ถ้วย
‐ อัลมอนด์บด 1 ถ้วย


วิธีทำ
1. ร่อนแป้ง 2 รอบ พักไว้
2. ร่อนผงโกโก้ เบกกิ้งโซดา และเกลือ 2 รอบ พักไว้
3. ตีเนยกับน้่ำตาลด้วยความเร็วสูงให้น้ำตาลขึ้นฟู
4. ใส่ไข่ไก่ และน้ำวนิลลา คนส่วนผสมให้เข้ากัน
5. ค่อยๆ ใส่ส่วนผสมของโกโก้ลงไป จนหมด คนส่วนผสมให้เข้ากัน
6. ค่อยๆ ใส่แป้งลงไปทีละนิด คนส่วนผสมไปเรื่อยๆ เติมจนส่วนผสมแป้งหมด
7. ใส่ชอคโกแลตชิพ และอัลมอนด์บด คนให้ส่วนผสมทั้งหมดเข้ากัน
8. วางคุ้กกี้ให้ได้ชิ้นประมาณ 1 นิ้ว แล้ววางห่างกันแต่ละชิ้นประมาณ 1 นิ้ว บนถาดอบที่รองด้วยกระดาษ
9. อบที่อุณหภูมิ 180 องศา 15 นาที
10. เสร็จแล้วพักคุ้กกี้ไว้ให้เย็น เก็บใส่โหล


Double chocolate chips cookies


Ingredients
- 2 cups of all purpose flour
- 250 grams of salted butter
- 2 cups of white sugar
- 2 chicken eggs
- 2 teaspoons of vanilla extract
- 1 cup of cacao powder
- 1 teaspoon of baking powder
- ½ teaspoon of salt
- 1 cup of chocolate chip
- 1 cup of grounded almond


How to prepare
1. Sieve the flour 2 times then let it rest
2. Sieve the cacao powder, baking soda and salt 2 times and let it rest
3. Beat the butter with the sugar in high speed until it turns foamy
4. Add 2 eggs and vanilla extract. Mix them well
5. Add, little by little, the mixture of cacao and mix it well
6. Add, little by little, the flour and mix it well
7. Then add the chocolate chips and grounded almond. Mix all well
8. Make small mounts of 1 inch in diameter in the tray covered with baking paper and leave space between the mounts of dough to allow it to grow
9. Bake it in 180c for 15 minutes
10. Rest the baked cookies in the tray until they get cold. Store it in a pot


Biscoitos de duplo chocolate com pepitas


Ingredientes
- 2 copos de farinha multiusos
- 250 gramas de manteiga com sal
- 2 copos de açúcar branco
- 2 ovos de galinha
- 2 colheres de chá de extracto de baunilha
- 1 copo de cacau em pó
- 1 colher de chá de fermento em pó
- ½ colher de chá de sal
- 1 copo de pepitas de chocolate
- 1 copo de amêndoas raladas


Como preparar
1. Peneire a farinha duas vezes e meta de lado
2. Peneire o cacau, o fermento e o sal duas vezes e meta de lado
3. Bata a manteiga com o açúcar em alta velocidade até que fique uma massa fofa
4. Junte os dois ovos e o extracto de baunilha. Misture bem
5. Adicione, pouco a pouco, a mistura do cacau e misture muito bem
6. Adicione, pouco a pouco, a mistura da farinha e misture bem
7. Junte as pepitas de chocolate e a amêndoa ralada. Mexa tudo muito bem
8. Faça pequenos montinhos, com cerca de 1 polegada de diâmetro, num tabuleiro coberto com papel de padeiro, e deixe espaço entre eles para que possam crescer
9. Leve ao forno a 180c por 15 minutos
10. Deixe arrefecer no tabuleiro e depois guarde num pote

Tuesday, March 30, 2010

ช็อกโกแลต ชีสคัพเค้ก - Chocolate cheese cupcakes - Queques de chocolate e queijo


ช็อกโกแลต ชีสคัพเค้ก

ส่วนผสม
- แป้งสาลีอเนกประสงค์ 65 กรัม
- เนยเค็ม 60 กรัม
- น้ำตาลทรายขาว 60 กรัม
- ช็อกโกแลตแบบหวาน 100 กรัม
- ไข่ไก่ 2 ฟอง
- ผงโกโก้ 1 ช้อนโต๊ะ
- ผงฟู ½ ช้อนชา
- ผิวเลม่อน 1 ลูก
- ช็อกโกแลตชิพ ตามชอบ
- อัลมอนด์บดหยาบ ตามชอบ
- ครีมชีส 250 กรัม
- น้ำตาลไอซิ่ง 50 กรัม
- ถ้วยกระดาษ


วิธีทำ
1. ละลายช็อกโกแลตในน้ำเดือด พักไว้
2. ตีไข่ไก่ เนย น้ำตาลให้เข้ากัน
3. ใส่ช็อกโกแลตที่ละลายแล้ว ตีให้เข้ากันดี
4. ใส่แป้ง ผงฟู ผงโกโก้ ที่ร่อนแล้ว 2 รอบ คนให้เข้ากัน
5. ใส่ผิวเลม่อน คนให้เข้ากัน
6. ทำครีมชีสโดย ผสมครีมชีสกับน้ำตาลไอซิ่งตีให้เข้ากัน
7. จัดส่วนผสมใส่ถ้วยกระดาษ ไม่ต้องใส่เต็มมากเพราะตอนอบมันจะฟูอีกนิดหน่อย โดยเริ่มจากส่วนผสมแป้งที่มีช็อกโกแลต ใส่ประมาณครึ่งถ้วย จากนั้นใส่ส่วนผสมของครีมชีสทับไปชั้นนึง แต่งหน้าด้วยอัลมอนด์บดหยาบและช็อกโกแลตชิพ
8. อบที่อุณหภูมิ 180 องศาเซลเซียส 20-25 นาที


Chocolate cheese cupcakes


Ingredients
- 65 grams of all purpose flour
- 60 grams of salted butter
- 60 grams of white sugar
- 100 grams of sweet black chocolate
- 2 chicken eggs
- 1 tablespoons of cocoa powder
- ½ teaspoon of baking powder
- 1 lemon (lemon zest)
- Chocolate chip (depend on you)
- Ground almond (depend on you)
- 250 grams of cream cheese
- 50 grams of icing sugar
- Paper cup for baking


How to make it
1. Melt the chocolate and put to rest
2. Beat the eggs, butter and white sugar together
3. Add the chocolate to this mix
4. Add flour, baking powder and cocoa powder. Mix all the ingredients well
5. Add lemon zest and mix well again
6. Now let’s make the cream cheese part; mix the cream cheese and icing sugar. Beat and mix well
7. Put the chocolate mix in the paper cup until half cup is filled (don’t make it too full because when we bake it will grow and can came out). Then add the cream cheese mix on top. And garnish with the ground almond and chocolate chips
8. Bake for 20-25 minutes, on a pre-heat oven at 180º C


Queques de chocolate e queijo


Ingredientes
- 65 gramas de farinha com fermento peneirada
- 60 gramas de manteiga com sal
- 60 gramas de açúcar branco
- 100 gramas de chocolate negro doce
- 2 ovos de galinha
- 1 colher de sopa de cacau em pó peneirado
- ½ colher de chá de fermento em pó peneirado
- 1 limão (raspa do limão)
- Pepitas de chocolate (depende do gosto pessoal)
- Amêndoa ralada (depende do gosto pessoal)
- 250 gramas de creme de queijo
- 50 gramas de açúcar de pasteleiro
- Formas de papel para fazer bolos


Como preparar
1. Derreta o chocolate e deixe repousar
2. Bater os ovos, a manteiga e o açúcar branco
3. Junte o chocolate derretido
4. Adicione a farinha, o fermento em pó e o cacau. Misture tudo muito bem
5. Junte a raspa de limão e mexa bem
6. Agora prepare o creme de queijo; misture o creme de queijo com o açúcar de pasteleiro. Bata estes dois ingredientes muito até obter um creme macio
7. Introduza a mistura com o chocolate nas formas de papel até encher metade (não meta muito porque quando crescer pode sair). Depois meta o creme de queijo por cima. Decore com a amêndoa ralada e com as pepitas de chocolate
8. Leve ao forno pré-aquecido a 180º C durante 20-25 minutos

Friday, February 26, 2010

เครปเค้ก ~~ Crepe Cake ~~ Bolo de Crepe

เครปเค้ก

หลายคนสงสัยว่าแล้วเค้กนี้มันอาหารไทยตรงไหน ไม่ไทยเลยซักนิด จริงๆแล้วตอนที่ทำเค้กนี้ เนื่องมาจากว่าคิดถึงเพื่อนๆ พี่ๆ ที่ออฟฟิศเก่าเพราะเราจะกินเค้กนี้ด้วยกันเสมอ ที่ซื้อมาจากร้านที่เอ็มโพเรี่ยม แต่เนื่องจากไม่สามารถไปซื้อมากินหรือไปร่วมวงกินด้วยได้ ก็เลยทำเองซะเลย อยากกินมานานแล้ว ....


เค้กนี้ประกอบไปด้วย 3 ส่วน คือ
1. เนื้อเค้กที่เป็นฐาน
2. เครป
3. วิปครีมสำหรับทาเป็นชั้นๆ

เค้กที่เป็นฐานนี้จะนิ่มๆ เป็นฐานไว้ให้เค้กเครปไม่นิ่มมากไป แต่ถ้าใครไม่อยากทำฐานเค้ก อยากกินแต่เครปอย่างเดียว ก็ข้ามขั้นตอนนี้ไปได้เลย

แป้งเครป
เริ่มผสมแป้งเครปกันก่อนเพราะต้องเอาแป้งไปพักเข้าตู้เย็น จะได้ไม่เสียเวลา

ส่วนผสมแป้งเครป
1. ไข่ไก่ 4 ใบ
2. นมสด 500 ซีซี
3. น้ำตาลทราย 1 ช้อนโต๊ะ
4. แป้งสาลีเอนกประสงค์ 200 กรัม
5. เกลือ 1/8 ช้อนชา
6. ผงฟู 1/2 ช้อนชา
7. กลิ่นวานิลลา 1/2 ช้อนชา
8. เนยจืดละลาย 40 กรัม

วิธีทำ
1. ร่อนแป้ง เกลือและผงฟู 2 รอบ
2. ใส่ไข่ไก่ น้ำตาลทราย แล้วก็นม 250 ซีซี ผสมให้เข้ากันในชามใบใหญ่ ตีไข่ให้แตกให้หมด อย่าให้เหลือเป็นลิ่ม แล้วค่อยๆแบ่งแป้งลงไปทีละนิด
3. คนให้เข้ากัน เทจนแป้งหมด
4. เทนมส่วนที่เหลือลงไปแล้วคนให้เข้ากัน
5. ใส่เนยละลาย กลิ่นวานิลลา แล้วคนให้เข้ากันอีกครั้ง
6. คลุมด้วยพลาสติก พักไว้ในตู้เย็นช่องธรรมดา แช่ 30 นาที ถึง 1 ชั่วโมง แล้วจึงนำไปทอด

สปองจ์เค้ก
ส่วนผสมสปองจ์
1. ไข่ไก่ 2 ฟอง
2. ผงฟู 1/2 ช้อนชา
3. น้ำตาลทราย 70 กรัม
4. แป้งสาลีเอนกประสงค์ 65 กรัม
5. เนยจืดละลาย 60 กรัม
6. กลิ่นวานิลลา 1/2 ช้อนชา

วิธีทำ
1. ทาไขมันที่ฐานถาดพิมพ์กลมขนาด 9 นิ้ว ปูกระดาษไขทับ ทาไขมันบนกระดาษและด้านข้างพิมพ์
2. เตรียมชามใส่น้ำร้อนไว้ ร้อนแต่ไม่ต้องให้เดือด เอาชามไว้รองชามผสมตอนตีไข่ ไข่จะได้ฟูเร็ว
3. ร่อนแป้งกับผงฟู 2 รอบ
4. ใส่ไข่ไก่กับน้ำตาลลงในชามผสม แล้ววางบนชามน้ำร้อน อย่าให้ก้นชามไข่ติดกับน้ำร้อน เริ่มตีไข่ ใช้ความเร็วสูงสุด ตีจนขึ้นฟู
5. ใส่แป้ง ใช้ตะกร้อมือคนเบาๆ ให้แป้งเข้ากับไข่ อย่าให้เหลือผงแป้ง ให้เข้ากับไข่ให้หมด
6. เทเนยละลาย และวานิลลา
7. เทเค้กใส่พิมพ์ ถ้ามีฟองอากาศ เอาไม้จิ้มฟันจิ้มให้ทั่ว ช่วยไล่ฟอง
8. อบที่อุณหภูมิ 180 C 20 นาที
9. อบเสร็จ คว่ำอเค้กอนตะแกรงค พอเย็นแล้ว ถ้าใครอยากให้เค้กออกมาดูสวยให้สไลด์เอาส่วนหน้าที่เป็นสีน้ำตาลเข้มออก แต่เราไม่ตัดออกเสียดาย ไม่สวยไม่เป็นไร ขอให้อร่อยเป็นพอแล้ว

พักเค้กไว้ แล้วมาทอดเครป
1. เอาเครปออกจากตู้เย็นา คนแป้งให้ทั่ว ตั้งไฟกะทะเทฟลอน ใครจะทาน้ำมันที่กระทะก็ได้ แต่เราไม่ทา ก็ไม่เห็นว่าเครปมันจะติดกระทะไร เค้กอ้วนแล้ว อย่าใส่น้ำทันลงไปอีกเลย
2. ใช้ไฟที่ปานกลางถึงแรง จะร่อนออกจากกระทะง่ายกว่าใช้ไฟอ่อน
3. พอกะทะเริ่มร้อน เทแป้งเครปลงไป เอียงกะทะให้แป้งคลุมพื้นกะทะให้ทั่ว ถ้าไม่รีบแป้งจะเกาะหนา ไม่สวย
3. พอแป้งเครปเริ่มสุก พลิกอีกด้าน

ส่วนครีม
ส่วนผสมครีม
1. วิปครีม 2 ถ้วยตวง
2. เนยจืด 25 กรัม
3. น้ำตาลไอซิ่ง 30 กรัม


This cake has 3 different parts
1. the base
2. the crepe
3. and the cream

The base is like a sponge cake. Put this cake as the base to make the cake more stable and not too soft just with the crepe and cream. However, if you don’t like sponge cake don’t need to do it.

The cream to put in between every crepe

For the crepe part….Do this first then put it to rest in the refrigerator. While it cool down can work on another part to save the time.

Ingredients for crepe
- 4 eggs
- 500 cc of evaporated milk (can be fresh milk but I prefer evaporated milk because you will get a cheesy taste).
- 1 tbs of sugar
- 200 grams of all purpose flour
- 1/8 ts of salt
- ½ ts of baking powder
- ½ ts of vanilla extract
- 40 grams of melted unsalted butter

1. Sieve two times the flour + baking powder + salt
2. Put the eggs + evaporated milk + sugar in a big bowl
3. Mix them well
4. Put the flour mixed little by little and blend it well. This can be done by machine or manually.
5. Try to mix them well until it doesn’t have any bubbles
6. Add the melted unsalted butter and the vanilla extract
7. When the mixture becomes smooth, wrap the bowl with plastic and leave in the refrigerator for 30 minutes to 2 hours before cooking it in the frying pan.


The ingredients for the base or sponge cake
- 2 eggs
-½ tsp of baking powder
- 70 grams of sugar
- 65 grams of all purpose flour
- ½ ts of vanilla extract
- 60 grams of melted unsalted butter

1. Prepare the recipient to bake the cake. Put the vegetable paper and spray oil in the base and also in the sides
2. Prepare a bowl with warm to hot water. We will use this while we beat the egg to make it fluffy
3. Sieve two time the flour + baking powder
4. Add the eggs and the sugar in the bowl and put that bowl on top of the one with the warm water. Don’t let the base of the bowl touch the water or the mixture will cook with the hot temperature.
5. Beat the eggs and sugar until they become fluffy. When it’s ready the color will be a bit white. While beating be careful, do not to make bubbles in the mixture
6. Add the flour and mix them well until it becomes smooth
7. Put the mixture in the bowl to prepare to bake. If there is some bubbles, use a toothpick to remove it.
8. Bake for 20 minutes at 180 c
9. When it’s ready, remove from the container and put it in the rack to let the cake cool down.
10. After it gets cool, and if you want to give a professional look to the cake, you can cut the cake to make it all even and smooth.

Now go back to fry the crepes
1. Remove the mixture from the refrigerator
2. Use a non stick pan … I don’t put oil to fry but if you like it can use it.
3. Heat the pan to a medium to hot temperature… if not hot it will be difficult to remove the crepe. But, if too hot, will burn it fast.
4. For this amount of ingredients you will get 15-16 sheets of crepe if you use a 9 inch pan.

Ingredients for the crème
2 cups of whip cream
25 grams of unsalted butter
30 grams of icing sugar

1. Rest the butter until it gets soft then put in a bowl and beat it to make it even softer.
2. Add the cream and beat at a high speed to make the cream grow and then put the icing sugar
3. Keep beating at a high speed to make it grow more but be careful not to make it with bubbles.

Assemble the cake
1. Put the sponge base on top of a plate that you can turn around when you put the cream
2. Add cream on top of the base, spread it well and put 1 sheet of crepe
3. Repeat until the last sheet of crepe or until the remaining cream is enough to cover the cake.
4. If you want to trim the cake to make it look more professional, try to do it before applying the crème on the sides.

Decorate with some strawberry

Strawberry sauce
- 2 cups of strawberry, can be both fresh or frozen
- 1/3 cup of sugar (depend on your taste, if you don’t like it too sweet put less)
- 1-2 tbs of lemon juice (depend on your taste, if you like sour put more)

1. Put the strawberries in a saucepan and mash it well. The strawberries have some juice.
2. Add the sugar and lemon juice
3. Bring to a boil in a medium heat to make it thicker.
4. Let it cool down

After it can be use to serve together with a slice of the cake.

Bolo de crepe

Este bolo tem 3 partes distintas
1. A base
2. O crepe
3. E o creme

A base é como um bolo esponja. Use este tipo como base para dar mais estabilidade ao bolo e para que não fique tão mole. No entanto, caso prefira, pode usar apenas os crepes.

O creme é para meter entre os crepes

Para os crepes... Faça isto primeiro para deixar repousar no frigorífico. Enquanto descansa podemos trabalhar na outra parte e poupar tempo.

Ingredientes para o crepe
-4 ovos
-500 cc de leite evaporado (pode ser leite normal mas prefiro este tipo porque dá um sabor mais a queijo)
-1 colher de sopa de açúcar
- 200 gramas de farinha
-1/8 de colher de chá de sal
- ½ de colher de chá de fermento em pó
- ½ colher de chá de extracto de baunilha
- 40 gramas de manteiga sem sal derretida

1. Peneire duas vezes a farinha+o fermento em pó+sal
2. Meta os ovos+leite evaporado+açúcar numa tigela grande
3. Misture tudo bem
4. Meta a farinha, pouco a pouco, e misture tudo muito bem. Isto pode ser feito na máquina ou à mão.
5. Misture tudo muito bem até não haver mais bolhas de ar.
6. Adicione a manteiga derretida e o extracto de baunilha
7. Quando a mistura começar a ficar macia embrulhe a taça com plástico aderente e meta no frigorífico por 30 minutos a duas horas antes de cozer na frigideira.

Ingredientes para o bolo esponja de base

- 2 ovos
-½ colheres de sopa de fermento em pó
- 70 gramas de açúcar
- 65 gramas de farinha
- ½ colher de chá de extracto de baunilha
- 60 gramas de manteiga sem sal derretida

1. Prepare o recipiente para cozer o bolo. Meta papel vegetal e borrife com óleo.
2. Prepare uma taça com água quente. Isto vai ser usado para fazer os ovos mais fofos enquanto os bate
3. Peneire duas vezes a farinha+fermento em pó
4. Adicione os ovos e o açúcar na taça e meta-a por cima da outra com a água quente. Preste atenção para que não toque a água para prevenir que cozam
5. Bater os ovos e o açúcar até que a mistura fique fofa. Estará pronta quando a cor for esbranquiçada. Durante o processo de bater os ovos ter em atenção para não deixar bolhas de ar
6. Adicionar a farinha à mistura e mexer bem até que fique macia
7. Meter a mistura na forma para ir ao forno. Se ainda houver algumas bolhas de ar use um palito para as eliminar.
8. Cozer durante 20 minutos a 180 c
9. Quando estiver cozido, remova da forma e meta numa rede para arrefecer
10. Depois de frio, se pretender dar um aspecto mais profissional ao bolo, pode cortar de forma a que fique mais plano

Agora, vamos fazer os crepes
1. Retire a mistura do frigorífico
2. Use uma frigideira antiaderente… Eu não uso óleo para fritar mas, se gostar, pode usar
3. Aqueça a frigideira para médio ou alta temperatura… se não estiver suficientemente quente será difícil de retirar o crepe. Mas, se tiver muito quente, acabará por o queimar.
4. Esta quantidade de ingredientes é suficiente para fazer entre 15-16 crepes numa frigideira de 9 polegadas

Ingredientes para o creme
2 copos de natas batidas
25 gramas de manteiga sem sal
30 gramas de açúcar de pasteleiro

1. Deixe a manteiga repousar até que fique mole, depois meta-a na misturadora para a fazer ainda mais mole
2. Adicione as natas e misture a alta velocidade para que o creme cresça um pouco antes de juntar o açúcar de pasteleiro
3. Continue a bater a alta velocidade para que a mistura cresça ainda mais mas tenha em atenção para não criar bolhas de ar

Montar o bolo
1. Meta o bolo esponja para base num prato que possa rodar quando tiver de aplicar o creme
2. Adicione o creme no topo da base, espalhe bem e meta o primeiro crepe
3. Repita o processo até ao último crepe ou até ver que o creme só chegar para cobrir o bolo
4. se quiser aparar o bolo para lhe dar um aspecto mais profissional, tente faze-lo antes de aplicar o creme no topo e nos lados do bolo

Decore com morangos

Molho de morango
- 2 copos de morangos, podem ser frescos ou congelados
- 1/3 copo de açúcar (depende do gosto de cada um, se não gostar de doce pode meter menos)
- 1-2 colher de sopa de sumo de limão (depende do gosto de cada um, se gostar de um sabor mais ácido coloque mais)

1. Meta os morangos numa caçarola e esmague-os bem. Os morangos terão algum sumo.
2. Adicione o açúcar e o sumo de limão
3. Leve a ferver em lume brando para engrossar
4. Deixe arrefecer

Depois pode ser usado para servir junto com uma fatia de bolo.


วิธีทำ
1.ตีเนยให้นุ่ม เทครีมลงไปตีด้วยความเร็วสูง จนครีมเริ่มตั้งยอดอ่อนๆ ใส่น้ำตาลไอซิ่งลงไป ตีต่อจนครีมตั้งยอดแข็ง อย่าให้มันจับตัวเป็นก้อน และตีให้เนยละลายไปให้หมด ไม่งั้นจะมีก้อนเนยอยู่
2. เตรียมฐานหมุนมาสำหรับวางฐานเค้ก รองด้วยกระดาษรองเค้กหรือฟอล์ย
3. วางฐานเค้ก
4. ทาครีมให้ทั่ว จากนั้น วางแผ่นเครปบนครีม ถ้ามีเครปส่วนเกินออกมาให้เอากรรไกรเล็มๆ ให้พอดีกับฐาน
5. ทำซ้ำ ทาครีม วางแผ่นเครปไปเรื่อยๆ จนเครปแผ่นสุดท้าย ถ้าใครยังมีครีมเหลือก็ให้ทาหน้าเค้กได้เลย
6. นำไปแช่เย็น ให้ครีมเซ็ทตัวซัก 2-3 ชั่วโมง


ส่วนผสมซอส
1. สตอว์แบร์รี่ 2 ถ้วยตวง จะใช้สดหรือแช่แข็งก็ได้ ถ้าแข็งก็ให้เอามาวางไว้ข้างนอก ให้หายแข็งซักหน่อย
2. น้ำตาลทราย 1/3 ถ้วยตวง ถ้าใครไม่อยากให้หวานมากก็ลดจำนวนน้ำตาลลงได้ค่ะ
3. น้ำมะนาว 1 ช้อนชา

วิธีทำซอส
1.เอาสตรอว์เบอรี่ใส่ saucepan ใช้ที่บดมันฝรั่งหรือ potato masher บดให้ละเอียด จะมีน้ำออกมาจากสตรอว์เบอรี่
2. จากนั้นเทน้ำตาลและน้ำมะนาวลงไปผสมกับสตรอว์เบอรี่
3. เอาส่วนผสมทั้งหมดตั้งไฟกลาง รอจนเดือดมีฟองและข้น
4. ทิ้งให้เย็น แล้วเอาเข้าแช่ตู้เย็น ทานกับเครปเค้กอร่อยมากกกกกกกก

Crepe cake

Friday, February 19, 2010

บิสกิตโรล ~~ Biscuit Roll ~~ Biscoitos

บิสกิตโรล

บิสกิตโรล หรือคุ้กกี้นี้แหละ สูตรนี้เป็นสูตรเก่าแก่ที่เพื่อนแม่รุ่นเจ็ดสิบกว่าๆ เป็นผู้ถ่ายทอดวิชาให้ เค้าเรียกบิสกิตโรล ก็เลยเรียกตามเค้าง่ะทำครั้งใดไม่มีผิดหวัง อร่อยทุกครั้งจริงๆ

ส่วนผสมแบ่งออกเป็นสองส่วน คือส่วนที่เป็นช๊อกโกแลตที่เป็นสีดำ กับส่วนที่เป็นวนิลลาที่เป็นสีขาว ส่วนผสมมีดังนี้

ส่วนสีขาว
* แป้งสาลี 3 ถ้วย
* เนย 1 ก้อน
* น้ำตาล 1 ถ้วย
* เกลือ ¼ ช้อนชา
* ผงฟู 1 ช้อนชา
* โซดาไบคาร์โบเนต หรือ เบกกิ้งโซดา 1/8 ช้อนชา
* น้ำวนิลลา 1 ช้อนโต๊ะ
* นมสดคาร์เนชั่น 4 ช้อนโต๊ะ
* น้ำเปล่า 2 ช้อนโต๊ะ

ส่วนสีดำ
* แป้งสาลี 2 ¾ ถ้วย
* เนย 1 ก้อน
* ผงโกโก้ ¼ ถ้วย (เพื่อนแม่บอกว่า ตรานางพยาบาลดีที่สุด แต่บางที่เราไม่มีก็ใช้ยี่ก้อที่มีไป รสชาติไม่แตกต่างกันค่ะ)
* น้ำตาล 1 ถ้วย
* เกลือ ¼ ช้อนชา
* ผงฟู 1 ช้อนชา
* โซดาไบคาร์โบเนต หรือ เบกกิ้งโซดา 1/8 ช้อนชา
* น้ำวนิลลา ½ ช้อนโต๊ะ
* น้ำเปล่า 1 ช้อนโต๊ะ

วิธีทำ
1. ทำส่วนส่วนสีขาวและส่วนสีดำแยกกัน
2. เริ่มจากส่วนสีขาวก่อน ร่อนแป้ง + โซดาไบคาร์บอเนต + ผงฟู ด้วยกัน ซัก 2 รอบ
3. ผสมเนยกับน้ำตาลจนขึ้นฟู ตีจนขึ้นฟู จะใช้ตะกร้อมือหรือเครื่องตีก็ได้เหมือนกัน แต่ขอให้เนื้อเนียนและฟู
4. ใส่แป้งผสมไป เคล้าให้เข้ากัน
5. ตามด้วยใส่นมคาร์เนชั่น น้ำวนิลลา และน้ำเปล่า ผสมให้เข้ากันดี
6. เมื่อผสมส่วนผสมเข้ากันดีแล้ว แบ่งออกเป็น 6 ก้อนเท่าๆกัน ใส่ชามแล้วใช้ฟิล์มใสๆ ห่อชามไว้ พักไว้ในตู้เย็น ประมาณ 30 นาที – 1 ชั่วโมง ระหว่างนั้น มาทำส่วนสีดำ

ส่วนสีดำ
1. ทำเหมือนส่วนสีขาวทั้งหมด
2. ร่อนแป้ง + ผงโกโก้ + โซดาไบคาร์บอเนต + ผงฟู 2 รอบ
3. ผสมเนยกับน้ำตาลจนขึ้นฟู
4. ใส่แป้งผสมไป เคล้าให้เข้ากัน
5. ตามด้วยใส่นมคาร์เนชั่น น้ำวนิลลา และน้ำเปล่า ผสมให้เข้ากันดี
6. แบ่งออกเป็น 6 ก้อนเท่าๆกัน ใส่ชามแล้วใช้ฟิล์มใสๆ ห่อชามไว้ พักไว้ในตู้เย็น ประมาณ 30 นาที – 1 ชั่วโมง

วิธีม้วนให้เป็นลวดลาย
1. นำส่วนผสมทั้ง 2 สี ที่แข็งตัวแล้วเล็กน้อย มาคลึงเป็นแผ่นบางๆ อย่าบางมาก ไม่งั้นมันจะแยกออกจากกัน แต่ถ้าหนามากก็ไม่สวย กะเอาพอดีๆ
2. จะคลึงโดยเอาก้อนสีขาววางด้านล่าง และสีดำวางด้านบน แล้วคลึงทีเดียว หรือจะคลึงทีละสีแยกกัน แล้วนำมาประกบกันโดยวางแผ่นส่วนสีขาวไว้ด้านล่างแล้วสีดำด้านบนก็ได้ ลายออกมาเหมือนกันแล้วแต่คนถนัดแบบไหน ที่เอาส่วนสีขาววางด้านล่างนั้นเพราะส่วนสีขาวแข็งตัวกว่าส่วนสีดำเล็กน้อย ง่ายเวลาม้วน
3. แล้วก็ม้วนๆๆๆๆ ถ้าม้วนตามยาวจะได้แป้งยาวหน่อย แต่ลายน้อยเพราะม้วนได้ไม่หนามาก แต่ถ้าม้วนตามกว้างคุ้กกี้จะก้อนใหญ่กว่ามาก และได้ลายเยอะกว่า แต่เราชอบม้วนทางยาวเล็กน่ารักกว่า แต่แฟนเราชอบทางกว้างเพราะกินจุใจ
4. พอม้วนเสร็จก็ใช้พลาสติกห่อไว้ ปกติเราใช้ถุงพลาสติกขนาดใหญ่ มาตัดครึ่งแล้วห่อเอา เพราะมันหนากว่าใช้ฟิล์มที่ห่ออาหาร ช่วยรักษาทรงของขนมไว้ได้ ม้วนทีละคู่ เราก็จะได้ทั้งหมด 6 ม้วน ห่อทั้ง 6 ม้วน เข้าตู้เย็นแช่ไว้ข้ามคืน
5. วันรุ่งขึ้น เอาออกมา ตัด ระหว่างตัดเราก็จะเห็นลวดลายไปด้วย ตัดให้หนาประมาณ 1 ซม. - ครึ่งนิ้วได้ ถ้าหนามากเวลาอบด้านในจะไม่สุก วางไว้ในถาดห่างกันหน่อย ซักนิ้วนึง เพราะคุ้กกี้จะฟูอีกเวลาอบ
6. อบอุณหภูมิ 190 องศา ประมาณ 15-20 นาที
7. เอาคุกกี้ออกจากถาด พักไว้ ต้องให้เย็นสนิทถึงจะใส่โหลได้ ไม่งั้นมันจะไม่กรอบ เก็บขนมไว้ได้นานเป็นเดือน อร่อย รสชาติเหมือนเดิมไม่มีผิด

Biscuit Roll

Ingredients

Vanilla Layer
- 3 cups of all purpose flour
- 1 pack of salted butter
- 1 cup of sugar
- 1/4 teaspoon of salt
- 1 teaspoon of baking powder
- 1/8 tea spoon of baking soda
- 1 tablespoon of vanilla essence
- 4 tablespoons of evaporated milk
- 2 tablespoons of water


Chocolate Layer
- 2 ¾ cups of all purpose flour
- 1 pack of salted butter
- 1/4 cup of cocoa powder
- 1 cup of sugar
- 1/4 teaspoon of salt
- 1 teaspoon of baking powder
- 1/8 tea spoon of baking soda
- 1/2 tablespoon of vanilla essence
- 1 tablespoons of water

How to make
The vanilla and chocolate layers have to be prepared separately.

Vanilla Layer (look at the ingredients)
1. Start with the vanilla layer
2. Mix the ingredients: all purpose flour + baking powder + baking soda. Then sift this mix twice.
3. Mix butter and sugar until it gets fluffy. After add the mix of the previous one.
4. Add evaporated milk, vanilla essence, water and mix well.
5. Mold six small balls with this dough and put them to rest in a bowl covered with film in the fridge to harden (around 30 minutes – 1 hour).

Chocolate Layer (look at the ingredients)
1. Mix the ingredients: all purpose flour + cocoa powder + baking powder + baking soda. Then sift this mix twice.
2. Mix butter and sugar until it gets fluffy. After add the mix of the previous one.
3. Add evaporated milk, vanilla essence, water and mix well.
4. Mold six small balls with this dough and put them to rest in a bowl covered with film in the fridge to harden (around 30 minutes – 1 hour).

After the balls of vanilla and chocolate are hard enough to be flattened, use a kitchen roll to flatten them (one ball of vanilla and one of chocolate) thin in two layers on top of each other (usually we put the vanilla layer down because it’s harder than the chocolate one).
When you have a thin sheet of two layers (vanilla and chocolate) make a roll, wrap it in the plastic and put to rest in the fridge overnight. Now you will have six long rolls of vanilla and chocolate dough.


To bake it just remove it from the fridge and cut it in small slices (around 1 cm thick). Put it on the non-stick baking tray (allow some space between the slices because they will grow) and in the oven preheated to 190 Celsius, around 15 – 20 minutes (When you see a dark brownish color, the Biscuits are ready).

Before you store, let it cool down.


Biscoitos de baunilha e chocolate

Ingredientes
Camada de baunilha
* 3 copos de farinha
* 1 pacote de manteiga com sal
* 1 copo de açúcar
* 1/4 de colher de chá de sal
* 1 colher de chá de fermento em pó
* 1/8 colher de chá de bicarbonato de sódio
* 1 colher de sopa de essência de baunilha
* 4 colheres de sopa de leite evaporado
* 2 colheres de sopa de água

Camada de chocolate
* 2 3/4 copos de farinha
* 1 pacote de manteiga com sal
* 1/4 de cacau em pó
* 1 copo de açúcar
* 1/4 de colher de chá de sal
* 1 colher de chá de fermento em pó
* 1/8 colher de chá de bicarbonato de sódio
* 1/2 colher de sopa de essência de baunilha
* 1 colheres de sopa de água

Como preparar
As duas camadas devem ser preparadas em separado.

Camada de baunilha (veja os ingredientes)

1. Começar com a camada de baunilha

2. Misturar os ingredientes: farinha+fermento em pó+ bicarbonato de sódio. Depois peneirar a mistura duas vezes.

3. Misturar a manteiga com o açúcar até ficar fofa. Depois adicionar à mistura anterior.

4. Adicionar o leite evaporado, a essência de baunilha e a água. Misturar bem.

5. Molde seis pequenas bolas com a massa e deixe repousar numa taça coberta com plástico no frigorífico para ficar dura (cerca de 30 minutos a 1 hora)

Camada de chocolate (veja os ingredientes)

1. Misturar os ingredientes: farinha+cacau em pó+fermento em pó+bicarbonato de sódio. Depois peneirar a mistura duas vezes.

2. Misturar a manteiga com o açúcar até ficar fofa. Depois adicionar à mistura anterior.

3. Adicionar o leite evaporado, a essência de baunilha e a água. Misturar bem.

4. Molde seis pequenas bolas com a massa e deixe repousar numa taça coberta com plástico no frigorífico para ficar dura (cerca de 30 minutos a 1 hora).

Depois das bolas de baunilha e de chocolate estarem duras e possam ser achatadas, junte duas bolas e use um rolo de padeiro para as esticar e fazer finas (regra geral estico primeiro a de baunilha porque fica sempre mais dura do que a de chocolate).

Quando tiver uma fina folha feita dos dois sabores enrole, embrulhe em plástico e ponha no frigorífico durante a noite. Terá seis rolos de massa de baunilha e chocolate.

Para cozer basta retirar do frigorífico, cortar em pequenas rodelas (cerca de 1cm de espessura). Coloque as rodelas num tabuleiro de ir ao forno (deixe espaço entre as rodelas para que cresçam). Leve ao forno pré-aquecido a 190 graus, cerca de 15-20 minutos (quando estiverem com uma cor acastanhada estão prontos).